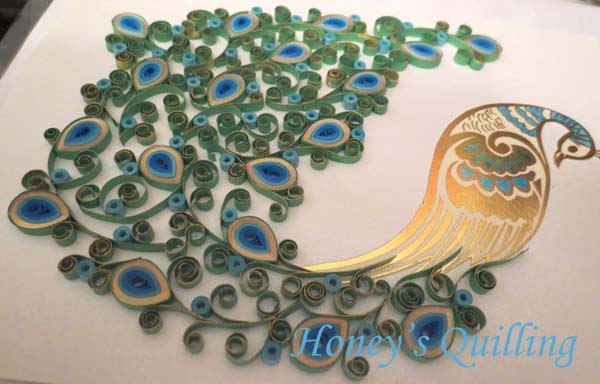
I’ve been posting a lot of reviews, tests, and tips with sealants lately, but I have also been doing some quilling! Here is a recent paper quilling peacock project I completed.
Something that I like to do when a family or close friend is getting married is to make a quilled frame using part of their wedding invitation in the design. Here is the peacock themed invitation we got for this wedding.

It was a bit harder than usual to decide what part to use. A lot of times there is a nice quote that I use. But there was no quote and no way to nicely cut out the names in a heart or anything, so I finally decided (and my husband helped me decide) to cut out the body of the peacock and add a paper quilled tail to it.
So this idea for a paper quilling peacock design was born! After cutting out the peacock body (I first used a craft knife to get into all the small places and then used tiny scissors
to smooth out the edges) I traced it on paper and put it under the plastic on my newly freshened quilling board.
Then I had to decide what size and style of shape I wanted for the eyes of the peacock feathers. I made about six different ones before I decided on these. I made these with 6″ aqua, 6″ turquoise, 12″ ivory with gold edge, and 3″ green papers. I used my circle template board to make sure each was the same size and then pinched them into teardrops.

After placing some of the main peacock feather eyes I decided to do green swirls edged in gold for the fill-in part of the design. I tried pinning a couple piece into place, but then decided that my usual tactic wasn’t going to work for this design and would be a pain the butt. So I decided to just work on the piece itself. I used the white pearl sheet of paper from this pack as the background.
I didn’t have any green paper with gold edge, so I used mica watercolors and a small paintbrush to paint the gold edge onto each strip of paper (I ripped the paper into 3″ lengths first to make it easy. Click here to learn how to use the mica watercolors on quilling paper. I bought my mica watercolors from USArtquest. You can find a set with the gold color here on Amazon

I glued the peacock body and then some of the peacock feather eyes. Then I started filling in with loose scrolls of the green with gold painted on the edge. I continued until it was the size I wanted, now I just needed to put more scrolls to fill in all the spaces!

All done! After filling in with lots of green scrolls I thought it needed a little more something so I used aqua paper to make small tight rolls to place throughout the tail for highlights.


The body of the peacock was looking a little lost since it was just gold and cream on a creamy white background. So, I used some markers to color in some of the peacock so it would pop out a bit.


Then it was time to frame it up! I used a 5″ by 7″ frame from Ikea. It wasn’t meant to be an inset frame so what I do is I cut the matte into strips and glue strips all around the inside next to the glass. I then glue the design paper in (the edges of it rest on the edges of the matte) and then I hot glue the back of the frame on. So it’s permanently sealed inside of the frame. Ideally I like to get the square inset frames at Ikea and do slightly bigger designs, but sometimes they are not available, so I used what was available.

It is really hard to get a good photo of quilling inside of the glass of a frame!

This was a fairly simple paper quilling peacock design, but fun to do. Peacocks are so pretty!
Here are some peacock earrings designs that I created as well:
Here are some more frame designs I have on the blog:
- Click here to view free paper quilling tutorials!
- Click here to view paper quilling tips and tricks!
- Click here to view a list of places to buy quilling supplies around the world!
- Click here to view some of my own quilling projects, with tips so you can make your own if you’d like!
*All products and supplies mentioned in this post I purchased and/or made on my own.
*This post contains some affiliate links, and some non affiliate links. If you purchase products through the affiliate links I get a small percentage (at no extra cost to you!). I only link to products that I believe in and/or love to use myself. Thank you for supporting my blog!


Beautiful !!!
Thanks 🙂
This is awesome…. liked it
Thanks 🙂
Wow, Honey that is amazing and beautiful!
Thanks!